How to Automate Faceless Shorts, Reels and TikToks With AI
A faceless video channel needs the same five steps every day: an idea, a voice, footage, captions and a post. This guide wires them into one workflow that runs on a schedule, and is honest about what it cannot do.
By The Vimitron Team · · 10 min read
What a faceless video workflow is
A faceless channel posts short videos where nobody appears on camera. The video is footage, a narrator's voice and captions. Most of the effort is not creative. It is the same chain of chores every day: think of a topic, write a few lines, record or generate a voice, find footage, add captions, upload, write a title.
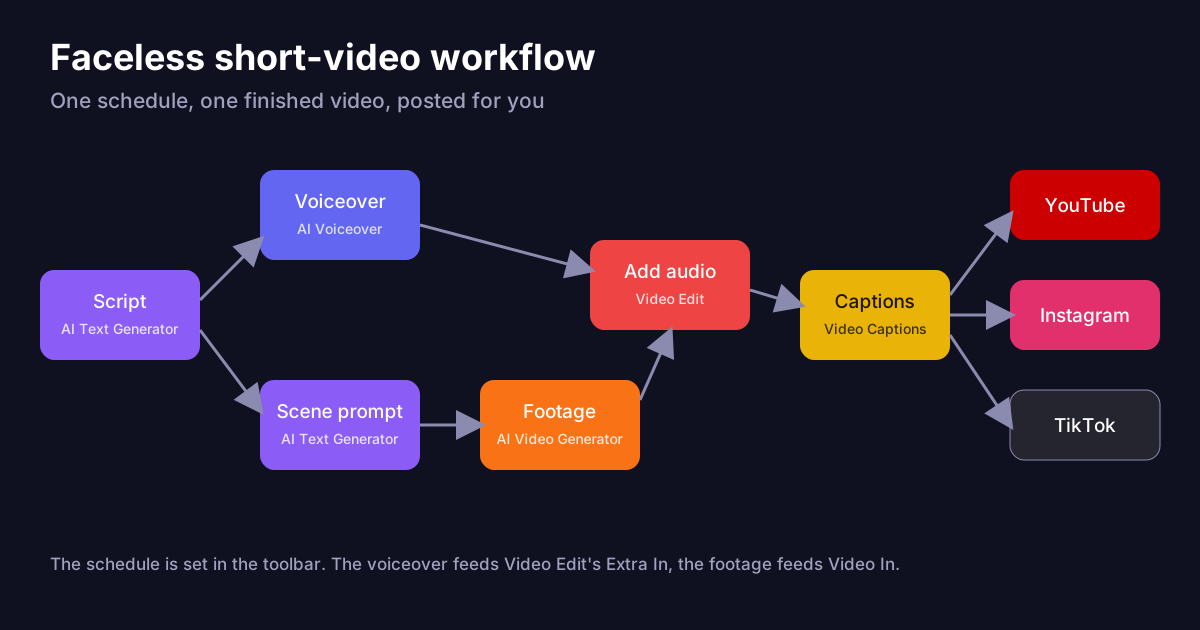
Those chores can be wired together once. This guide builds a workflow in the Vimitron workflow editor that does the whole chain on a schedule and posts the finished vertical video to YouTube Shorts, Instagram Reels and TikTok. It only uses nodes that already exist, and it points out where they stop.
Short answer. Chain an AI Text Generator (script) into AI Voiceover and AI Video Generator, join them in Video Edit with the *Add audio* edit, run the result through Video Captions, then wire it into the YouTube, Instagram and TikTok nodes. Turn on the schedule and it repeats.
Before you build: set the right expectations
Automation makes a video cheap to produce. It does not make it good, and it does not make anyone watch it. Platforms can tell mass-produced, near-identical clips from videos that someone cared about, and recommendation systems and monetisation rules both reward the second kind.
- Pick a narrow niche you can say something useful about. Facts, tips, short explainers and stories work. A random clip with a generic voice does not.
- Label AI content where the platform asks for it. YouTube, TikTok and Instagram each have rules for realistic AI-generated video. Check the current wording in the app when you connect the account, and switch the label on.
- Read the monetisation rules before you count on income. Channels full of repetitive or low-effort videos can be refused or removed from monetisation programmes.
- Do not copy other people's videos or voices. Everything here is generated from your own prompts.
- Check the first week by hand. A workflow that posts without anyone looking will eventually post something you would not have chosen.
The nodes you need
Everything comes from the node picker. If you have not used the editor, the workflow docs explain the canvas and how wires work, and the media nodes docs cover video, voiceover, captions and editing in detail.
| Step | Node | Job |
|---|---|---|
| 1 | Workflow schedule | Starts the run on a cron timer. It is a toolbar setting, not a node. |
| 2 | AI Text Generator (Script) | Writes the narration. |
| 3 | AI Voiceover | Turns the script into speech (Kokoro or ElevenLabs). |
| 4 | AI Text Generator (Scene prompt) | Turns the script into a visual description for the video model. |
| 5 | AI Video Generator | Makes the vertical footage. |
| 6 | Video Edit, Add audio | Puts the voiceover on the footage. |
| 7 | Video Captions | Transcribes the speech and burns subtitles into the video. |
| 8 | AI Text Generator (Caption) | Writes the title and caption text for the post. |
| 9 | YouTube, Instagram, TikTok | Publish the video with the caption. |
Two nodes you might reach for are not usable here. Code (JavaScript) cannot run in scheduled runs, and Canvas designs live in your browser tab, so a scheduled run cannot use them. Neither is needed for this build.
Match the script to the clip length
This is the one detail that makes or breaks the build. The *Add audio* edit keeps the length of the video. If the voiceover is longer than the footage, the end of the sentence is cut off. If it is shorter, the video ends with a quiet gap. So the clip length decides how long the script can be.
At a normal speaking pace, a narrator says roughly two to two and a half words a second. Use that to size the script, then run once and adjust. Pick a video model whose duration options cover what you need. The LTX 2.3 Fast model, for example, offers 6 to 20 seconds in steps of 2 and is described as the low-cost option.
| Clip length | Script length (about) | Good for |
|---|---|---|
| 6 seconds | 12 to 15 words | One striking fact or a hook |
| 10 seconds | 20 to 25 words | A quick tip |
| 16 seconds | 35 to 40 words | A fact with a short explanation |
| 20 seconds | 45 to 50 words | A tiny story with a payoff |
Ask for fewer words than you think. Tell the script writer to stay under the word count, not to hit it. A line that ends half a second early sounds natural. A line that is cut mid-word does not.
Longer videos are possible, since Video Edit accepts up to 2 minutes, and Merge clips joins up to five videos. Each extra clip costs tokens and makes the footage harder to keep consistent, so start with one clip.
Build it step by step
- Connect your accounts: Open Socials and connect YouTube, Instagram and TikTok. Connect only the ones you will post to. The social publishing docs list what each platform needs.
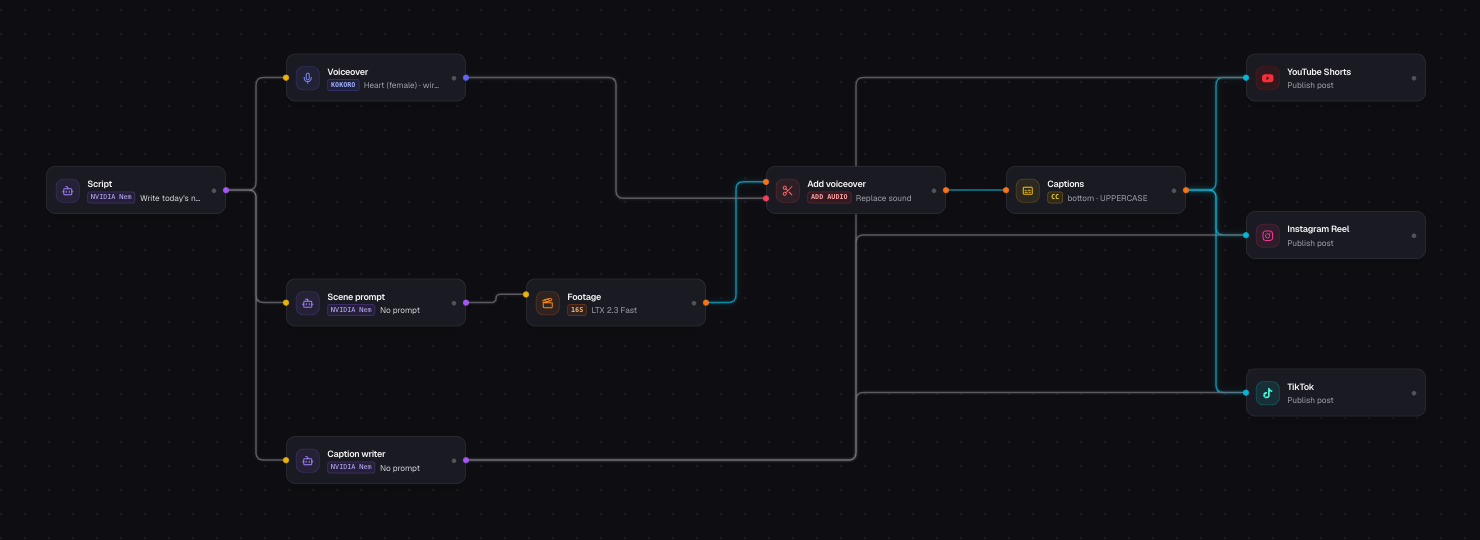
- Add the Script writer: Add an AI Text Generator and name it *Script*. Paste the script prompt from the next section. Its Text Out port carries the narration.
- Add the voiceover: Add an AI Voiceover node and wire the script into Text In. Choose Kokoro for the lowest price or ElevenLabs for more expressive voices, pick a voice, and use Preview voiceover in the settings to hear it before you run anything.
- Add the scene prompt: Add a second AI Text Generator named *Scene prompt*, wire the script into it, and paste the scene prompt from the next section. It turns the narration into one visual description.
- Add the footage: Add an AI Video Generator, wire the scene prompt into Prompt In, set the shape to 9:16 and pick a duration that matches your script. Leave Start Image empty to generate from text.
- Join voice and footage: Add a Video Edit node and choose Add audio. Wire the footage into Video In and the voiceover into Extra In. Set the audio to Replace so the model's own sound does not play under the narrator.
- Add captions: Add a Video Captions node and wire Video Edit into it. Captions are built from the speech in the video, which is why the voiceover has to be on the clip first. Try the Bottom position and a font size around 48 as a starting point.
- Add the caption writer: Add a third AI Text Generator named *Caption*, wire the script into it and paste the caption prompt. This text becomes the post's title and description.
- Add the posting nodes: Add YouTube, Instagram and TikTok nodes. Wire the captioned video into each one's Media In, and wire the caption writer's text into the same port. The engine uses the video as the media and the plain text as the caption.
- Run it once, then schedule it: Click Run and read the log. The video and captions take a few minutes. Watch the result in the library before it posts anywhere you cannot undo. When you are happy, open Schedule, choose a time and switch it on.
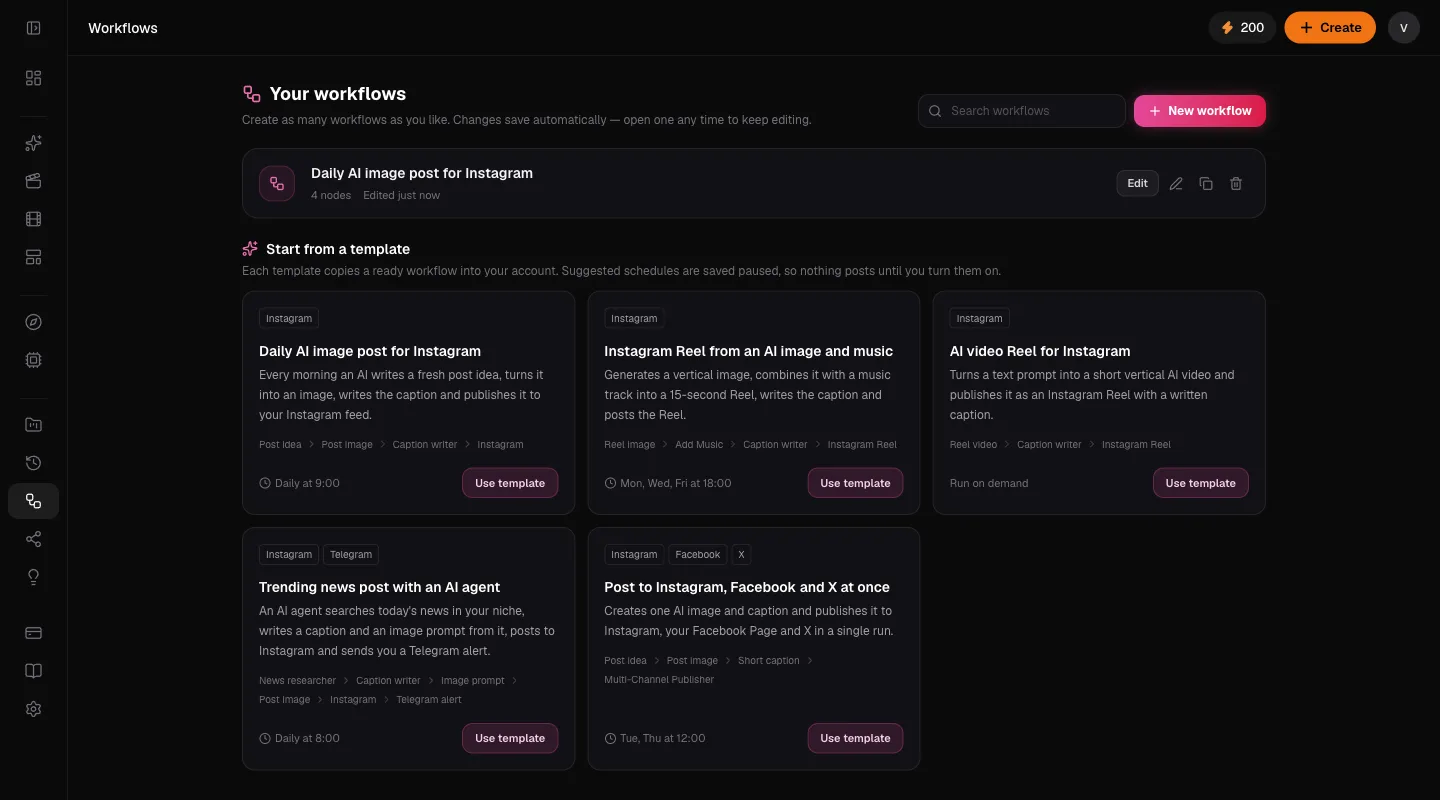
Start smaller if you want. The AI video Reel template is a one-clip version that posts to Instagram. Copy it, then add the voiceover, Video Edit and captions steps above. Copied templates start with their schedule paused.
The prompts that make it work
The text nodes carry most of the quality. Replace the bracketed parts with your own niche. Each prompt is short on purpose, because the smaller the job, the more consistent the result.
Script writer
You write narration for a vertical video of about [16] seconds on the topic of [your niche].
Pick one specific, true and useful point. Open with a hook of five words or fewer.
Write plain spoken sentences, no hashtags, no emojis, no stage directions.
Stay under [35] words. Return only the narration.
Scene prompt
Describe one continuous camera shot that would suit this narration. No people's faces, no text on screen.
Name the subject, the lighting and one slow camera move. Keep it under 50 words. Return only the description.
Caption writer
Write a title of up to 70 characters for this video, then a blank line, then a two-sentence description.
Add three relevant hashtags at the end. Do not exaggerate or promise results.
Asking for no faces and no text on screen is deliberate. Video models are weakest at faces, hands and lettering, and a scene without them looks much less artificial. Landscapes, objects, macro shots, abstract motion and cityscapes hold up best.
Posting to YouTube, Instagram and TikTok
The three nodes take the same video, but each platform has its own limits. The Multi-Channel Publisher only covers Instagram, X and Facebook, so for video to YouTube and TikTok use their own nodes as above.
| Platform | What to know |
|---|---|
| YouTube | The node only accepts video. A vertical clip of this length is eligible to appear as a Short. Videos are published with the visibility configured for the site, which defaults to public. |
| Posted as a Reel. It must be MP4, 3 to 90 seconds. Instagram sometimes needs a minute to process before it goes live. | |
| TikTok | Posts through TikTok's official upload. Depending on your account and the app's approval, TikTok may publish it as private (Only me). Check the first post and change its visibility in TikTok if needed. |
If one platform fails, the others are not affected. Each posting node reports its own result in the run log.
What it costs and how long it takes
Every media node shows its token price before you run it, so you can see the cost of a full run by adding them up. The video is the biggest part, because video models charge per second of footage and the price depends on the model and resolution. See tokens and pricing for what a token buys.
- Voiceover: priced by characters. Kokoro is 40 tokens per 1,000 characters, so a 300-character script is about 12 tokens. ElevenLabs Turbo v2.5 is 100 tokens per 1,000 characters.
- Video: the node shows the price per second for the model you pick. Choose the cheapest model whose footage looks acceptable for your niche, then upgrade only if it matters.
- Captions and editing: shown in each node.
- Text: the script, scene and caption writers are the cheapest steps. Each node shows its price, and the daily free tokens cover them.
A run takes minutes rather than seconds. The workflow waits for the video, then for the edit, then for the captions. Failed media steps give tokens back, so a broken run does not cost you.
Limits and how to work around them
- It does not remember earlier videos. The script writer sees only its own prompt, so it may repeat a topic. Add a numbered list of topics to the prompt, or save the last topic in a variable as described in the workflow docs.
- Footage is generated, not found. You cannot ask for a specific real place or product. Describe the mood and the subject instead.
- Footage is short. One clip is the length you choose in the video node. Longer stories need Merge clips, which adds cost and risks a change of style between clips.
- The voice is a synthetic voice. It is clear but not a person. Use the preview to pick a voice that suits the niche.
- Text in the video can come out garbled. Keep words in the captions node, not in the scene description.
- Free models can be rate limited at busy times. If the text steps fail, pick another model in the node settings.
To find out when a scheduled run breaks, turn on Alerts in the workflow toolbar. It sends you a Telegram message after a failed run, so a silent workflow never goes unnoticed.
A sensible first week
Do not start with a daily schedule. Run the workflow by hand three or four times with different topics and watch each video all the way through. Fix the script prompt until the narration sounds like a person you would listen to. Then schedule it for two or three days a week and read every video before it goes out for the first couple of weeks.
The goal is a workflow you trust. Once you do, the schedule does the repetitive part and you spend your time on the part that matters, which is choosing a niche worth watching.
Build your first faceless video Open the editor, add the script and voiceover nodes, and run it once to hear the result. The text steps are the cheapest part. Open the workflow editor
Frequently asked questions
Can I automate faceless videos without coding?
Yes. The workflow editor is visual. You add nodes, wire them together and write three short prompts. No programming is needed, though the Code node is not available in scheduled runs.
Does the voiceover have to match the video length?
Yes, closely. The Add audio edit keeps the video's length, so a voiceover that is too long is cut off and one that is too short leaves a quiet gap. Size the script from the clip length, roughly two to two and a half words per second.
Which platforms can it post to?
YouTube, Instagram and TikTok each have their own node and accept video. The Multi-Channel Publisher covers Instagram, X and Facebook, so use the individual YouTube and TikTok nodes for those two.
Will my videos get views or be monetised?
Nothing here guarantees either. Platforms favour videos that give viewers something useful, and they can refuse or remove monetisation from repetitive, low-effort channels. Choose a narrow niche, label AI content where required and review what goes out.
Do I need to label videos as AI-generated?
Many platforms ask you to label realistic AI-generated video. The rules change, so check the current wording in YouTube, TikTok and Instagram when you connect the account, and turn the label on where it applies.
Is this an alternative to building it in n8n?
It covers the same idea, a schedule, AI steps and posting on a visual canvas, with the video, voiceover and caption nodes built in. There is no server to set up and no separate API keys for the models. It is smaller than n8n, and running custom code in scheduled runs is not available.