How to Automate LinkedIn Content Creation Without Sounding Like AI
Most automated LinkedIn posts read the same because they start from the same empty prompt. This guide shows a workflow that starts from your own notes, writes in rules you set, sends you the draft and posts it on a schedule.
By The Vimitron Team · · 11 min read
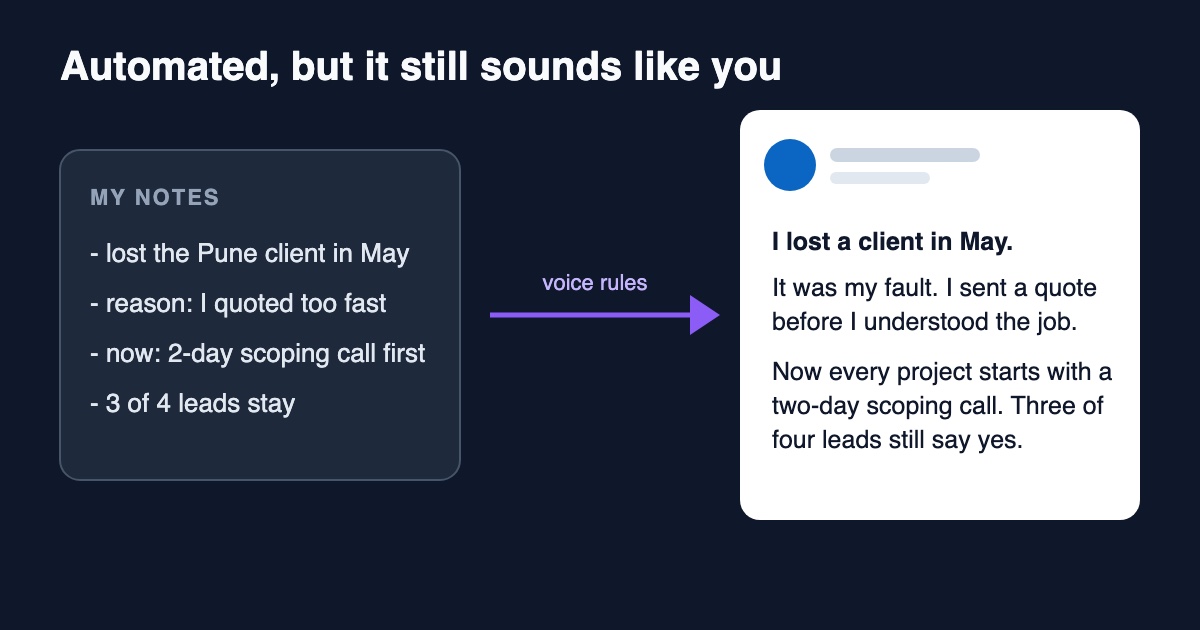
Why automated LinkedIn posts sound like AI
You can scroll LinkedIn for ten seconds and spot the posts a model wrote. A staircase of one-line paragraphs. A hook that promises a lesson. Three tidy takeaways and a question at the end. Nobody decided that was good writing. It is simply the average of millions of posts, and an AI that has nothing else to go on gives you the average.
That is the real problem if you want to automate LinkedIn content creation without sounding like AI. The model is not the weak link. The empty prompt is. "Write a LinkedIn post about leadership" contains no facts, no opinion and no history, so the model fills the gap with the most common things people have said about leadership. You can automate everything around the writing, but the material has to come from you.
Short answer. Automate the typing, the formatting and the posting. Do not automate the experience. Give an AI Text Generator node your own notes and a strict set of voice rules, send yourself the draft to read, and let a LinkedIn node publish it on a schedule.
- Your notes
- Voice rules
- AI Text Generator
- You read the draft
- LinkedIn post
The habits that give an AI post away
Before you write any rules, it helps to know what you are removing. These are the patterns that show up again and again in machine-written LinkedIn posts, why a model produces them, and what to say in your instructions instead.
| The habit | Why a model writes it | What to tell it instead |
|---|---|---|
| Opens with "I'm thrilled to announce" or a big claim | Announcements and bold hooks are the most common way posts start, so they are the safest guess | Start with what happened, in plain words, as the first sentence |
| Every sentence is its own paragraph | It copies the look of posts that went viral | Paragraphs of one to four sentences, and at most one single-line paragraph |
| "Here's the thing:", "Let that sink in", "Read that again" | Stock phrases that signal emphasis in a lot of the training text | List the phrases you never use and ban them by name |
| Three parallel points, such as "faster, simpler, better" | Triplets feel complete, so models reach for them | No lists of three adjectives or three parallel phrases |
| A vague lesson with no detail, such as "consistency is key" | With no real facts in the prompt, general advice is all that is left | Use only facts from the notes, and write a shorter post if the notes are thin |
| Ends with "Thoughts?" or "Agree?" | Posts that ask for comments are common, so the model adds one by reflex | No closing question and no call to engage |
Notice that most fixes are subtractions. A model is easy to push toward plain writing once you tell it exactly what to leave out. Telling it to "sound more human" does very little, because it has no idea what you mean by human.
What to automate and what to keep for yourself
The goal is to remove the work you dislike, which is staring at an empty box on a Tuesday morning, and keep the part that makes people follow you. Here is a split that works for most people:
| Automate | Keep for yourself |
|---|---|
| Turning rough notes into a clean first draft | The story, the opinion and the numbers in your notes |
| Keeping the same tone and layout from post to post | Deciding what is worth saying this week |
| Picking up the draft at a set time | Reading it once before it goes out |
| Attaching an image and publishing | Replying to comments and messages |
Notes can be very rough. One line each is enough: what happened, what you got wrong, what you do now, and one result. Five minutes of typing on a Sunday gives the workflow a week of real material, and that is the part no tool can invent for you.
Before you start
This guide uses four things you already have access to. One of them has a limit worth knowing about up front.
- A connected LinkedIn account. On Socials, choose LinkedIn and sign in through LinkedIn's own page. Your password is never shared with us, and you can disconnect at any time. Posts go to the profile you connect.
- An image or video for every post. The LinkedIn node needs media. If nothing with an image or video link reaches it, the run stops with an error, so text-only posts are not possible here yet. The workflow below adds an image for this reason.
- Your notes. A few lines per post, as described above.
- Two or three posts you wrote yourself. They teach the model your rhythm far better than a description of your style.
Posts to a profile, not a company page. This guide covers publishing to your personal profile. It does not cover company pages.
Build the workflow step by step
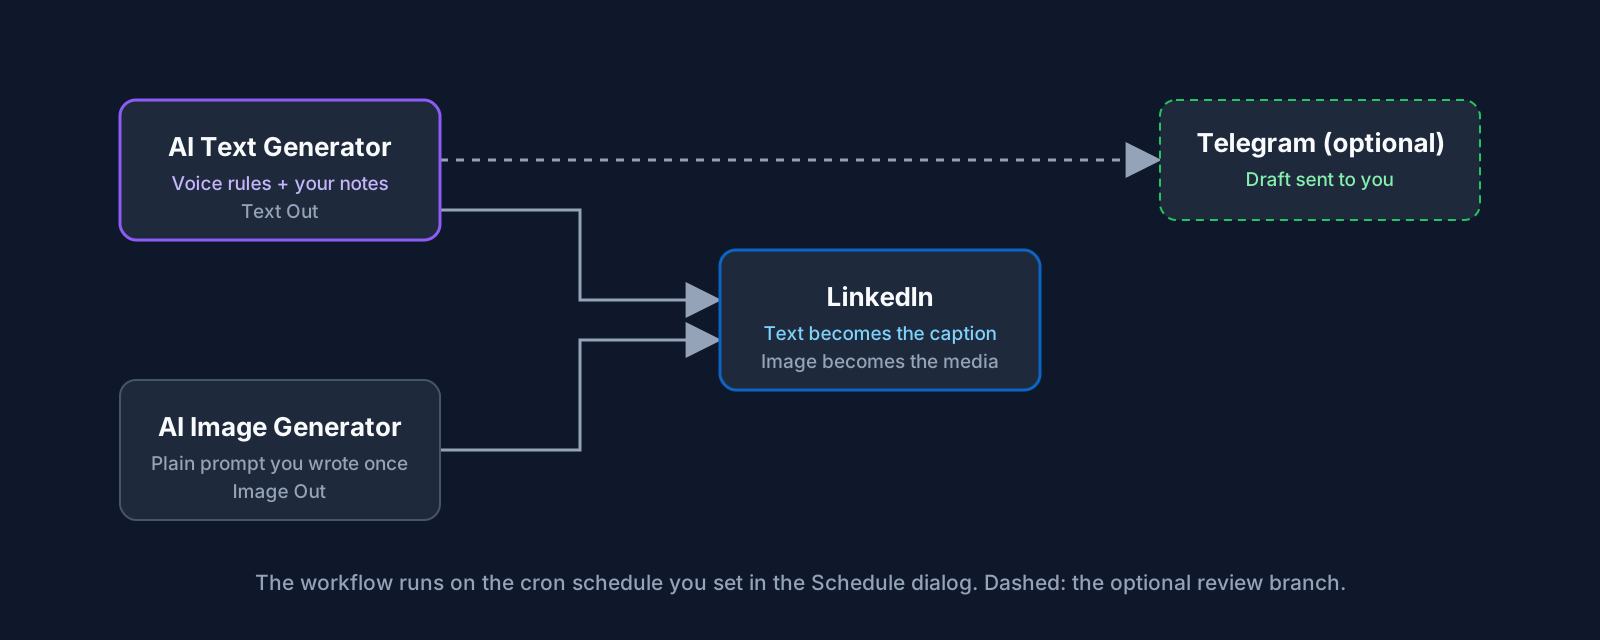
- Add an AI Text Generator node: Open the workflow editor and add the node. Put your voice rules in the System prompt field and this week's notes in the Prompt field. The next section has the rules to paste. Leave the output format on text.
- Check Max tokens and Temperature: The node defaults to 500 max tokens, which fits a post of about 1,300 characters, but raise it if your posts run longer so the ending is not cut off. A temperature of 0.7 is a fine start. Lower values give plainer, more predictable wording, higher ones give more variety and more flourishes.
- Add an AI Image Generator node: Write one plain prompt and keep it. For example: a simple flat illustration of an open notebook on a desk, muted blue and grey, no text, no people. Images with writing in them often come out garbled, so ask for none. If you would rather reuse a picture you already made, an Image Library node works too.
- Add a LinkedIn node and wire both in: Connect the text node's Text Out and the image node's Image Out to the LinkedIn node's Media In. The image becomes the media and the text becomes the caption. Leave the LinkedIn node's own caption empty, because a caption typed there would win over the wired text. Choose your connected account.
- Tune the voice before LinkedIn is connected: Pressing Run on a workflow that includes the LinkedIn node publishes a real post. So first build only the text node and a Telegram node (see "Keep yourself in the loop"), run it with a few different sets of notes and adjust the rules until the drafts sound like you. Then wire in the image and LinkedIn nodes.
Hashtags and special characters are handled for you. The LinkedIn node escapes characters that LinkedIn treats as formatting, and turns any #tag into a proper hashtag. Captions are cut at 3,000 characters, which is the LinkedIn limit, though a post that long is rarely a good idea.
The voice rules and notes to paste in
This is the part that decides whether the post sounds like you. Paste it into the System prompt field, replace the two bracketed examples with posts you actually wrote, and edit any rule that does not match how you write.
You are ghostwriting a LinkedIn post for me. Write in the first person, as me.

Use only the facts in the notes I give you. Do not add numbers, names, clients, results or quotes that are not in the notes. If the notes are thin, write a shorter post instead of padding it.

Style:
- Start with what happened. Never start with an announcement, a greeting or a question.
- Plain words. Mix short sentences with a few longer ones.
- Paragraphs of one to four sentences. At most one single-line paragraph.
- No emojis.
- At most two hashtags, at the very end.
- No closing question and no call to comment or share.
- Never use: thrilled, excited to share, game-changer, here's the thing, let that sink in, in today's world, unlock, leverage, journey, deep dive.
- No lists of three adjectives or three parallel phrases.
- Between 900 and 1,300 characters.

Here are two posts I wrote myself. Match their rhythm, not their topics.

[PASTE POST 1]

[PASTE POST 2]

Output only the post text.
Then put your notes in the Prompt field. Here is an example. These notes are made up for illustration:
Notes for this post:
- Lost a client in May.
- Reason: I sent a quote before I understood the job.
- Change: every project now starts with a two-day scoping call.
- Result so far: three of four leads still go ahead.
The rule that does the most work is the second paragraph, "use only the facts in the notes". Without it, a model will happily invent a percentage or a dramatic client quote to make the post land. With it, a thin set of notes gives a short post, which is better than a padded one. Each week you change only the notes. The voice rules stay put.
Grow the banned list over time. Each time a draft contains a phrase you would never say, add it to the "Never use" line. After a month the list is a fairly accurate fingerprint of what you dislike, and the drafts get closer to you without any extra work.
Keep yourself in the loop: read the draft before it posts
A fully hands-off workflow is the fastest way to publish something you would not have written. There is no approval pause built into the LinkedIn node, so the review step has to be designed around it. There are two sensible ways to do that.
Option one: a draft workflow, you post it
Skip the LinkedIn node. Wire the AI Text Generator into a Telegram node and leave its message empty, which sends the wired text as it is. You get the draft on your phone, edit it in a minute and paste it into LinkedIn yourself. This is the safest start, and for many people it is where they stay.
Option two: send the draft, then post later
Keep the LinkedIn node and also wire the text into a Telegram node. In the LinkedIn node's schedule settings, choose to post after a delay, for example a few hours. You get the draft straight away and the post is queued. If the draft is good, do nothing. If it is not, remove the queued post from the Socials page before it goes out and check that it is gone from the list.
The catch with option two is that doing nothing means publishing. If you are busy for a day, the post goes out unread. Choose it only once your drafts have been good for a few weeks, and keep the delay long enough that you will actually see the message.
The 60-second edit before anything goes out
Even good drafts need a pass. This checklist is short on purpose, so you will actually do it:
- Check every fact against your notes. Names, numbers and dates are the places a model quietly changes things.
- Read the first sentence aloud. If you would not say it to a colleague, rewrite it.
- Cut the last line if it sums up the post. Posts usually end better one sentence earlier.
- Add one detail only you know. The name of the town, the tool, the awkward email. A single concrete detail does more than any amount of tone instructions.
- Look for a phrase you have seen on ten other posts. If you find one, change it and add it to the banned list.
Put it on a schedule you can keep up with
Open the Schedule dialog in the editor, pick the days and the time, and switch it on. Scheduled runs happen on the server, so your browser can stay closed. The workflow then runs by itself and uses whatever notes are in the Prompt field at that moment.
That last point matters. If you forget to update the notes, the same post is generated again. Pick a rhythm that you can keep feeding with real material. One post a week with real notes beats three a week padded with filler, and your readers will notice the difference long before any tool does.
If you also post to Instagram, the same pattern applies there. The Instagram automation guide shows the image and caption side of a workflow like this one.
Limits and LinkedIn's rules
- Media is required. Every post needs an image or video. There is no text-only option yet.
- Profile only. Posts go to the personal profile you connected, not to a company page.
- The model can still slip. Read each draft, especially in the first weeks. A banned phrase can still appear, and a number can still change.
- The notes do not update themselves. A schedule with stale notes repeats itself.
- Generated images are easy to spot. A plain illustration is safer than a detailed one, and a real photo of your own is better still.
Post your own content, and nothing else. This workflow publishes your own posts through LinkedIn's official sign-in. Do not use automation to send connection requests, comment on other people's posts or message strangers. LinkedIn restricts automated activity like that, and it also reads as spam. Check LinkedIn's current rules before you build anything beyond posting.
Build your first workflow
Start with the draft-only version from option one. It takes a few minutes, nothing is published while you test, and it shows you quickly whether your voice rules are working. When the drafts sound like you, add the image and LinkedIn nodes.
Write your voice rules once Open the editor, add an AI Text Generator, paste the rules above and run it against this week's notes. Open the workflow editor
Frequently asked questions
How do I automate LinkedIn content creation without sounding like AI?
Give the model your own notes instead of a topic, and write rules that say what to leave out: no announcement openings, no stock phrases, no closing question, and only facts from the notes. Then read each draft before it goes out. The writing can be automated, but the experience in it has to come from you.
Can I post text-only updates to LinkedIn with this workflow?
Not yet. The LinkedIn node needs an image or video, and the run stops with an error if none arrives. The workflow in this guide adds an AI image for that reason. You can also reuse an image you already generated.
Does LinkedIn penalise AI-written posts?
LinkedIn does not publish how it ranks posts, so nobody outside can promise an answer either way. What you can control is whether a real reader finds the post specific and useful, which is the same thing that makes a post work when you write it by hand.
Will an AI detector flag these posts?
Detectors are unreliable and disagree with each other, so passing one is a poor goal. A better test is whether the post contains facts and details that only you could know. Posts built from your own notes tend to, because the notes are where the detail comes from.
Can it publish to my company page?
This guide covers your personal profile only. Posts go to the profile you connect through LinkedIn's sign-in.
Can the workflow comment on posts or send connection requests for me?
No, and we would advise against building that. LinkedIn restricts automated engagement, and automated comments tend to read as spam. Use the workflow for your own posts and do the conversation yourself.